Comprehensive guide to increasing energy efficiency and weatherproofing wooden front doors – by Modern Doors Ltd
Wooden external doors are usually fitted without any modifications into a rebated frame (frame that overlaps the edge of the door). The frame is normally equipped with a rubber seal in the rebate to stop the draught and water getting through around the edges. This is different to upvc or aluminium front doors. Those alternatives normally have both door and frame rebated, however require stepping over a chunky frame, which is not ideal. Timber door sets are usually not equipped with any seal between the frame sill and bottom edge of the door, naturally letting wind and occasionally water to get in to your hallway. Most importantly though, this gap at the bottom of the door lets precious energy escape from the house (or actually the cold from outside cooling the temperature inside), adding extra strain to the cost of maintaining a warm house during cold wintery days.
Most people prefer a wooden front door simply because of the warmer feel it gives – it is natural, sturdy and heavy, the available designs are far more attractive and it makes the house look more presentable. So how can you have a wooden exterior door that is fully sealed from the weather?
Sealing outside frame
First things first… make sure there are no gaps around the outside edge of the frame. If there are any, it’s relatively easy to fill them up with building foam (be careful not to overdo it, the foam expands and can apply pressure on the frame causing problems with door closing), silicone or sand and cement. Some paint and making good afterwards and one problem has been solved.
Sealing between door and frame (top and sides)
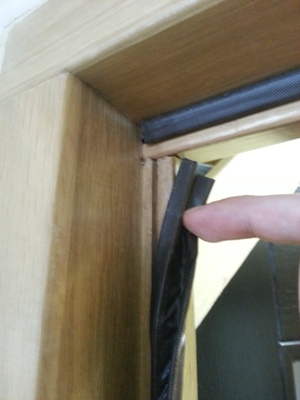
Majority of exterior door frames in the UK are equipped with a thick rubber seal (weather seal) of a decent quality so it’s just making sure the seal sits in its place, does not twist and the rubber has not depreciated (this is rarely the case as they tend to last at least 10-20 years). If the rubber seal needs replacing, it’s cheap (£5-£15) and easy to install. If your house is located on a busy street and the noise coming from outside through the front door is excessive, you could use additional acoustic seals to dampen that noise. Depending on the exact profile of your frame you could use either a corner perimeter seal or flat perimeter seal.

Typical rubber weather seal in external door frame
Sealing bottom edge of the door
This is the most critical part and there are several methods to make sure this part of the door set is sealed appropriately.
– Brush draught excluders – cheapest (£5-£10), readily available in any DIY store brush seals mounted on the bottom of door face. They do stop the draughts but do not offer the best weather protection or energy efficiency – water will still get through and so will the cold air. As well as this, they are mounted in the same place as weather bars (more about weather bars below), so you will be forced to compromise. Generally a good product for its price but falls short compared to other products in this sector.

Typical brush draught excluder for front doors
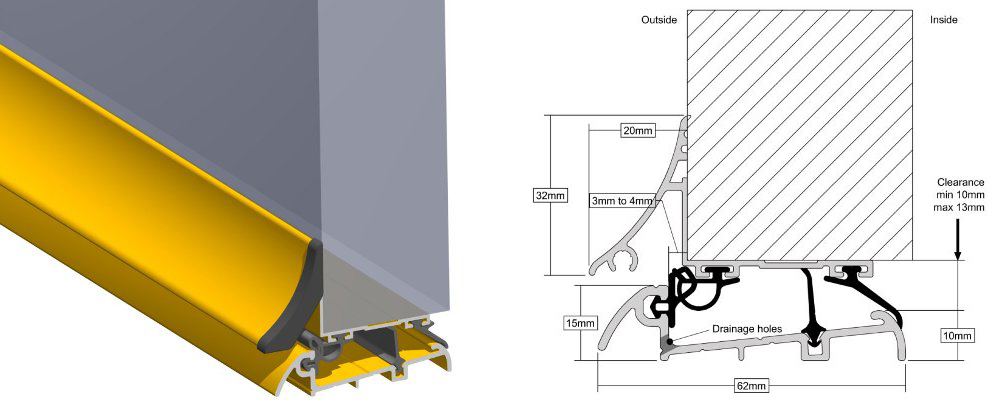
– Complete threshold systems – variety of systems mounted on top of existing door sills, or replacing the door sills altogether. Some include weather bars and most are suitable for disabled access. Prices range between £20-£60, and the installation, depending on the specific system, varies from easy to challenging and some can be only installed when the door frame is completely removed and re-morticed. These threshold systems provide great weather protection and are very good overall, the only minor disadvantage is the fact that all parts are visible and they need “stepping over”. Stormguard is probably the most popular, but not the only brand and has an extensive range of these systems. Products marked as compliant with BS6375 Part 1 offer the best weather tightness.
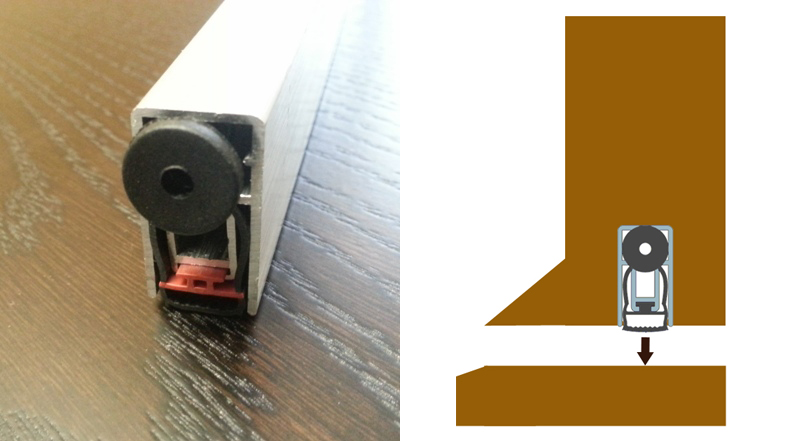
– Drop down seals – extremely practical all-in-one automatic devices installed into the bottom edge of the door (underneath). Completely invisible from outside or inside the house, the device is equipped with a button released spring mechanism, which releases a rubber seal when the door is shut and retracts the seal when the door opens by just a few millimetres. These drop down seals will stop the air, water, noise, smoke and fire from coming through under the door and their cost ranges from £20-£50. Installation requires routing into the bottom edge of the door, but otherwise it’s fairly easy – a piece of cake for any skilled carpenter or experienced DIYer equipped with a router. There are a few different brands offering a range of products of different qualities and sometimes with different installation methods. They are primarily used on internal doors for acoustic and fire protection, therefore for your front door we recommend the better quality ones with thick rubber seals. It’s best coupled with a weather bar for a complete and practical solution to sealing bottom of the door.
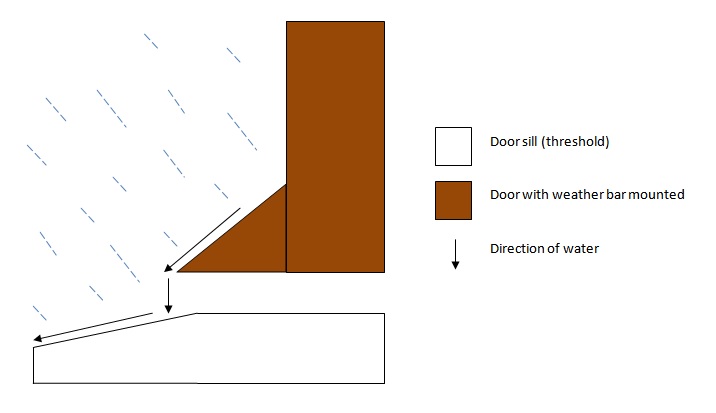
– Weather bars – large variety of triangular shaped bars made of timber, plastic or metal and installed at the bottom of door face. Their sole purpose is to deflect the rain running down the door face, away from the bottom edge of the door (see the diagram below). The weather bars will not stop any draught or cold coming through! However, they are quite effective at draining the water away, letting it drop onto usually sloped door sill or threshold, which drives it further away. Weather bars are most effective when installed right at the bottom edge of the door and installing them higher (for instance because of brush draught excluder already installed there) will make them less effective. They can be installed lower to reduce the gap as much as possible, but will never fully close that gap in inwards opening doors (otherwise the door simply won’t close). Very easy installation and low cost (£10-£20).

Illustration of weather bar functionality
Sealing other parts of your front door
– Check for any gaps around the door hardware – especially bolted through ironmongery such as door viewers, knobs, handles, door bells and cable holes. If there are any gaps, use silicone to seal them (you can get different colour silicone to match the colour of your door).
– Letterboxes – If you have a letterbox fitted in the door set make sure it has been fitted with weather proofing. Letterbox is effectively a large hole in your door surface and could let in a lot of draught and cold. This can be mitigated by using a sleeved letterbox with integrated weather proofing system – rubber and brush seals or by adding brush draught excluders or special energy saving covers to existing letterboxes.
– Keyholes – If your door has been fitted with one of the traditional mortice locks, then the key hole is yet another part that will let cold air inside. For obvious reasons it cannot be sealed but there are escutcheons with covers that can be used, if your lock hasn’t been supplied with one of these already. Using a cylinder type lock eliminates this problem completely.

From the left: 1. Mortice type key hole and key 2. Mortice escutcheon with cover (Era) 3. Cylinder type lock with security escutcheon (Era)
Cost calculations and efficiency
So how much it will all cost me and how much will I save on energy bills? Is it worth it?
Well it all depends on the individual scenario – on the condition of the existing front door set, how much heating is being used and how much of it is wasted because of cold air getting in from outside.
It’s always best (and cheapest) to get the right products with the new door, rather than installing them afterwards. In most cases a combination of automatic drop down seal, weather bar and weather proof letterbox (£100 combined cost) will make a significant difference and could pay back for itself in just a year or two. As well as this you will get increased acoustic insulation, no letterbox flapping in the wind and no water leaks into your hallway, so it’s definitely a worthy investment.
If you are undertaking any of the weather proofing methods described above, whether on a brand new door or an existing door, please use the comments below to share with us how it went and what reduction in energy bills you have achieved. Based on this information, we might be able to provide more accurate cost and efficiency information in the future.


